Due to some circumstances, this blog is now up for sale, for more enquires contact: Plushista@gmail.com
RealcomBiz
Showing posts with label Blogger tips. Show all posts

How To Change Your Blogger List Post Into a Grid or Gallery View

Generally, all default blogger template are arrange in list style, while some bloggers (especially those who run a fashion blog) have been looking for a way to style their blogger template to a grid  or gallery style. I have receive couple of emails from different bloggers asking, if there is a way they can style their blogspot template into a grid style. Now here i come with a hack that can do the job perfectly well.


This hack will position your post thumbnail at the top, and align the post summary at the bottom with an automatic jump break or "read more" link, which will appear at the end of each summary after a specified number of characters. Bigs-up to Muhammad Hassan on these.
The hack will only work on homepage, archive,  label and search page (not with Google custom search.) Love that? Let's get it done then.


Turning List Style to Grid Style

  • Go to your blogger dashboard
  • Click on Template > Edit HTML
  • Use ctrl F to find </head> and paste the following code above/before it.

<!-- Grid Style Hack For Blogger By www.RealcomBiz.com Start-->
<b:if cond='data:blog.pageType != &quot;item&quot;'>
<b:if cond='data:blog.pageType != &quot;static_page&quot;'>
<script type='text/javascript'>
var thumbnail_mode = &quot;yes&quot; ;
summary_noimg = 400;
summary_img = 180;
img_thumb_height = 130;
img_thumb_width = 220;
</script>
<script type='text/javascript'>
//<![CDATA[
/*
Grid Style Hack For Blogger By www.realcombiz.com
*/
function removeHtmlTag(strx,chop){if(strx.indexOf("<")!=-1){var s=strx.split("<");for(var i=0;i<s.length;i++){if(s[i].indexOf(">")!=-1){s[i]=s[i].substring(s[i].indexOf(">")+1,s[i].length)}}strx=s.join("")}chop=(chop<strx.length-1)?chop:strx.length-2;while(strx.charAt(chop-1)!=' '&&strx.indexOf(' ',chop)!=-1)chop++;strx=strx.substring(0,chop-1);return strx+'...'}function createSummaryAndThumb(pID){var div=document.getElementById(pID);var imgtag="";var img=div.getElementsByTagName("img");var summ=summary_noimg;if(img.length>=1){imgtag='<span style="float:left; padding:0px 10px 5px 0px;"><img src="'+img[0].src+'" width="'+img_thumb_width+'px" height="'+img_thumb_height+'px"/></span>';summ=summary_img}var summary=imgtag+'<div>'+removeHtmlTag(div.innerHTML,summ)+'</div>';div.innerHTML=summary}
//]]>
</script>
<style type='text/css'>
.post {width:44%;height:370px;float:left;margin:10px;position:relative;display: block;}
.post h3{height:32px;margin-top:60px; margin-bottom:-15px;padding:5px;font-family: Helvetica, Arial;line-height:1em;font-weight: bold;  font-size:16px;letter-spacing:-0.5px;}
.post-body {padding:5px;height:241.5px;font-family: Helvetica, Arial; font-size: 13px; margin:20px;}
.post-footer {margin-top:20px;height:20px;}
.post-labels {display:none;}
.mobile .post {width:auto;height:auto;}
.mobile .post-body {height:auto;}
</style>
</b:if>
</b:if>
<!-- Grid Style Hack For Blogger By www.RealcomBiz.com  End -->

Now search for <data:post.body/> and replace it with the following code. You may find 2-3 occurrence of this line, but don't replace the first occurrence with it.

<!-- Grid Style Hack For Blogger By www.RealcomBiz.com Start -->
<b:if cond='data:blog.pageType == "item"'> <data:post.body/> <b:else/> <b:if cond='data:blog.pageType == "static_page"'> <data:post.body/> <b:else/> <div expr:id='"summary" + data:post.id'><data:post.body/></div> <script type='text/javascript'> createSummaryAndThumb("summary<data:post.id/>"); </script> <a class='more' expr:href='data:post.url'>Read More...</a> </b:if> </b:if>
<!-- Grid Style Hack For Blogger By www.RealcomBiz.com End -->


Customization

  • If you don't want to show post image thumbnail, change "yes" to "no"
  • "400" represent the number of characters to be displayed if a post has no image.
  • "180" represent the number of characters to be displayed if a post has an image, but only the first image within the post structure will be use as thumbnail.
  • The height of the thumbnail is "130"
  • The width of the thumbnail is "220". Both the thumbnail height and width value can be adjusted to your own preferred value.
  • You can change the word "Read More..."  to something more enticing like "Continue reading..." Better still, replacing the read more link with image button will be super-cool.

Note: You may find your Home, Newer, Older post link missing. Don't worry, here is a fix for it. Go to the Edit HTML section of your template, find <b:includable id='nextprev'> and paste the following code after/below it.

<div style='clear:both;'/>

Save your template. Taaddaaaa! You are done.
Read more→

How To Change Feedburner Email Subject Line To Your Blog Post Title

The best way to turn first time visitor's to a regular readers is to encourage them to subscribe to your RSS feed. But how bad is it when they saw your blog RSS update in their email and they still don't read it? It means your headline is boring. Have you ever subscribe to a blog via email? If the blog burn their feed using feedburner, you’ll see the subject line and the “from” field bearing the name of the blog that you subscribed to. That's boring, don't you think so?


We have discuss the importance of headline in different post and also wrote a post on how to write compelling headline that people can't resist. But how do you feel when your captivating headline never get clicked due to the fact that it was hidden behind a boring subject line?
There are few blogs that I subscribe to that I will open their email to see the content regardless of what the subject line says. While there are some that i sometimes delete without opening. The ones that fall in the latter category can still urge me into reading their post if i see an enticing subject line.

By default, people who subscribe via email to a blog that uses Feedburner as their feed manager will receive a generic email whose subject line will bear the blog title like:

RealcomBiz

But after customizing your blog feedburner  email subject line, your blog updates will appear in your blog subscribers email like:

RealcomBiz - How To Change Feedburner Email Subject Line To Your Blog Post Title

Sounds good? Then let's get it done.

How to Create a Custom Subject Line for Your Blog’s

  • Log in to your Feedburner account.
  • Click the name of the feed you want to update.
  • Click on the "Publicize" tab.

  • Choose "Email Subscriptions" from the navigation menu at the left hand corner, then click on "Email Branding"
  • Inside the "Email Subject/Title" box, enter the following code.


${latestItemTitle}

The above code will replace your blog title with your latest post title. If you want your blog title to show alongside with you latest post title, use the following code.

Your-Blog-Title - ${latestItemTitle}

Replace Your-Blog-Title with your blog name, or you can still use it in another way round for more effectiveness like:

${latestItemTitle} - Your-Blog-Title

If you publish more than one blog post daily, paste any of following code under the text area that says "Change Subject when an email has 2 or more items"

Your-Blog-Title (in this message: ${n} new items

OR

Your-Blog-Title - “${latestItemTitle}” plus ${m} more

${n} - shows the total number of items
${m} - shows the number of items beyond the latest

You might also like to check out our 5 Stylish Feedburner Email Subscription Box.

Save your changes when you are done with the editing. That's all.
Read more→

How To Stick Or Float Widget In Blogger

Most big blogs have sticky widget that scroll along when visitors move up and down. The effect is usually applied to navigation menu or subscription box, but what kept most people thinking is how they can add the effect to their blog widget. Does that sound like you?


This effect will make a widget float downward when visitors scroll down and stay on its original position when visitors scroll up and reach the widget position. The trick is applicable to any widget so far it has a unique ID, regardless of its location, be it top, bottom or sidebar.

The effect is added to the first navigation menu on the demo page.


How To Add It Blogger

  • Go to Template > Edit HTML
  • Use ctrl F to find </body> and paste the following code above it.

<script>
// Sticky Widget By RealcomBiz.com
//<![CDATA[
rb_makeSticky("WIDGET ID HERE"); // enter your widget ID here
function rb_makeSticky(elem) {
    var rb_sticky = document.getElementById(elem);
    var scrollee = document.createElement("div");
    rb_sticky.parentNode.insertBefore(scrollee, rb_sticky);
    var width = rb_sticky.offsetWidth;
    var iniClass = rb_sticky.className + ' rb_sticky';
    window.addEventListener('scroll', rb_sticking, false);
    function rb_sticking() {
        var rect = scrollee.getBoundingClientRect();
        if (rect.top < 0) {
            rb_sticky.className = iniClass + ' rb_sticking';
            rb_sticky.style.width = width + "px";
        } else {
            rb_sticky.className = iniClass;
        }
    }
}
//]]>
</script>

<style>
.rb_sticking {background:#f2f2f2 !important; position:fixed; top:0; z-index:9999; box-shadow:0px 10px 4px -5px rgba(0,0,0,0.3);}
</style> 

  •  Replace WIDGET ID HERE with your widget unique ID.

How To Get Widget ID

  • Visit any page on your blog, but make sure you have already log-in into your dashboard
  • Right click on the edit icon (wrench icon) below the widget you want to apply the trick to.

  • Select Copy Link Location and paste it into a notepad.
  • You should be having something similar to the code below

http://www.blogger.com/rearrange?blogID=****************&widgetType=HTML&widgetId=HTML**&action=editWidget&sectionId=crosscol

  • Copy the widget ID after the line &widgetId= and place it in the line specified above.

If you have any queries or suggestions, feel free to drop it in the comment.
Read more→

Add Copyright Notice With Read More Link to Copied Text of your Blog

It's always a good idea to protect blog content from copy and paste bloggers, and this make us to write on how to disable highlight function and how to disable right click context menu on images. But i think i need to provide something more outstanding, so 1 will be sharing with you, how you can add copyright notice to copied text of your blog. But it only works with all major browser except internet explorer.
This is how it works. When someone copied your blog content and paste it any anywhere, the script will add a link back to your site as the original source with a copyright notice. Sounds cool, right?


If you are on Wordpress you can use iCopyright or add the following code into your blog head section. But for blogger follow the below steps.


How to Add Copyright Notice to Copied Text

  • Go to your blogger dashboard
  • Click on Template > Edit HTML > Proceed (Mark/Tick Expand Widget Template)
  • Use ctrl F to find </head> and paste the following code above it.

<!-- Copyright Notice By RealcomBiz.com -->
<script type='text/javascript'>
function addLink() {
var body_element = document.getElementsByTagName(&#39;body&#39;)[0];
var selection;
selection = window.getSelection();
var pagelink = &quot;<br/><br/> Read more at: <a href='&quot;+document.location.href+&quot;'>&quot;+document.location.href+&quot;</a><br/>Copyright &#169; RealcomBiz&quot;; // You can change this to your prefered text
var copytext = selection + pagelink;
var newdiv = document.createElement(&#39;div&#39;);
newdiv.style.position=&#39;absolute&#39;;
newdiv.style.left=&#39;-99999px&#39;;
body_element.appendChild(newdiv);
newdiv.innerHTML = copytext;
selection.selectAllChildren(newdiv);
window.setTimeout(function() {
body_element.removeChild(newdiv);
},0);
}
document.oncopy = addLink;
</script>

  • You can change the above highlighted line to your own preferred copyright text.
  • Save your template. Done!
If you have any queries or suggestion, feel free to drop it in the comment box.
Read more→

10 Activities That Will Cause Your Blogger Blog To Be Deleted

Blogger platform is no doubt the best platform for newbie bloggers to start off. There are lot's of controversial that blogger team are deleting blogs for no reason which i don't believe. Google (blogger) have set Content policy and Terms of Service and any blogger that violate the rules will get is blog suspended or deleted.


No blogger want his/her years of hard work to go in vain likewise Google don't want any blogger to experience such catastrophe, but still want to create a spam free community for its users. That's why they set terms and condition in place which i believe we all accept it but not sure that we all read it.

What are the reasons why your blog is deleted?

  1.  Violating privacy

Publishing another person personal and confidential information without the person permission is strictly against Google terms of service. Example include: contact information, home address, email address, credit card numbers, driver's license numbers etc.

  2.  Impersonation

Stealing someone else identity is against Google policy. Pretending to be someone else when you or pretending to represent another organization or group when you are not, is highly punishable under the law.

  3.  Copywrite violation

Google have been taking legal action on any blog owner that go against its content policy. No one likes it when someone copied their content without crediting it. If by anyway the owner of the original content report to Google, then your site will be completely deleted if you continue to plagiarize another people's content.

  4.  Hate speech

Blogger is a platform where anybody can share is opinion, stories, news etc. And it's true that there is freedom of speech but up to a certain level. Discriminating other sex, age, religious or ethnic group is not permitted by Google and it can lead to suspension or permanent deletion.

  5.  Violence

Threatening other people or certain group of people on your blog is against the law and Google policy. Also, don't encourage reader's to take violent action against another person or group of people.

  6.  Malware and viruses

Malware and viruses is against better user experience, that's why Google is taking all possible action to make internet safe for its users. If your site is infected by virus or distributing script that attempt to install software, or steal another people's personal information will lead to a permanent deletion of your blog.

  7.  Adult Content

Distribution of adult content like images and videos or pornographic is allowed on blogger but you must be sure to mark your blog as "Adult" oriented site from the settings of your site. by not complying with these rule will cause your site to be deleted. You can still make money from an adult site, but their is limited amount of ads banner you can place on the site.

  8.  Child Safety

Your site must be safe for children. Do not publish any content that encourage  or promotes sexual attraction to children. Also distributing child pornography is against Google terms of use and can lead to a severe punishment if reported to higher authorities.

  9.  Spam

Spam is the most foulest activity you can perform with your blog. All major search detest any user or blog that have be tricking their robot with some blackhat seo techniques just to boost their blog up in any search listing. Any blog that is cut in this act will be removed from indexing and both the user account and the blog will be deleted.

  10.  Illegal activities

Using blogger to encourage people to involve in illegal activities like drug, weed, drinking and driving is against Google terms of service. Any illegal activities that you know is punishable under the law is not allowed Google and will lead to permanent ban.

Blogger is not the only platform that set terms of service for its users, every other platform does too. Abiding by their rules will keep your blog safe but violating their terms of use will cause your blog to be banned or deleted.
Have you ever experience burden? Share your story in the comment and we also welcome any queries.
Read more→

Stylish CSS Tooltip For Hyperlink

Tooltip is a message or hint that appears when a user hover mouse cursor on an icon, image, hyperlink or any other similar element. It is use to give description of an element for better user experience. This Tooltip is styled with CSS and works in conjunction with HTML code. It can be used on both blogger or wordpress self hosted blog. For a demo of how this tutorial works, hover your mouse cursor on the following link.


DEMO:  Blogger TipsWe Offer The Best Blogger Tips

Adding CSS Code

If you are on wordpress, you will need to insert the following code into your template style sheet. For blogger hosted blog, follow the steps below.
  • Go to your blogger dashboard
  • Click on Template > Edit HTML > Proceed
  • Use ctrl F to find ]]></b:skin> and paste the following code above/before it.

/* Stylish CSS Tooltip By RealcomBiz.com */
a:link,
a:visited {
position:relative;
}
.rbtooltip {
width:300px;
position:absolute;
bottom:100%;
margin:0 0 7px 0;
padding:5px;
font-family:Verdana,sans-serif;
font-size:13px;
font-weight:normal;
font-style:normal;
text-align:left;
text-decoration:none;
text-shadow:0 1px 0 rgba(255,255,255,0.3);
line-height:1.5;
border:solid 1px;
-moz-border-radius:7px;
-webkit-border-radius:7px;
border-radius:7px;
-moz-box-shadow:
0 1px 2px rgba(0,0,0,0.3),
0 1px 2px rgba(255,255,255,0.5) inset;
-webkit-box-shadow:
0 1px 2px rgba(0,0,0,0.3),
0 1px 2px rgba(255,255,255,0.5) inset;
box-shadow:
0 1px 2px rgba(0,0,0,0.3),
0 1px 2px rgba(255,255,255,0.5) inset;
cursor:default;
display:block;
visibility:hidden;
opacity:0;
z-index:999;
-moz-transition:all 0.4s linear;
-webkit-transition:all 0.4s linear;
-o-transition:all 0.4s linear;
transition:all 0.4s linear;
color:#2B2B2B;
background:#C0C0C0;
background:-moz-linear-gradient(top,rgba(192,192,192,0.8),rgba(192,192,192,1));
background:-webkit-gradient(linear,left top,left bottom,from(rgba(192,192,192,0.8)),to(rgba(192,192,192,1)));
border-color:#999999;
}
.rbtooltip:before,
.rbtooltip:after
{
width:0;
height:0;
position:absolute;
bottom:0;
margin:0 0 -20px -10px;
border:solid 10px;
border-color:transparent;
display:table-cell;
content:"";
}
.rbtooltip:before
{
margin:0 0 -24px -12px;
border:solid 12px;
border-color:transparent;
z-index:-1;
}
a:hover .rbtooltip
{
text-decoration:none;
visibility:visible;
opacity:1;
-moz-transition:all 0.2s linear;
-webkit-transition:all 0.2s linear;
-o-transition:all 0.2s linear;
transition:all 0.2s linear;
}
.rbtooltip,
.rbtooltip.left {
left:0;
right:0;
}
.rbtooltip:before,
.rbtooltip:after,
.rbtooltip.left:before,
.rbtooltip.left:after {
left:40px;
right:auto;
}
.rbtooltip:before {
border-top-color:#999999;
}
.rbtooltip:after {
border-top-color:#C0C0C0;
}
/* Stylish CSS Tooltip By RealcomBiz.com */
  • Save your template

Adding HTML code

Whenever you are drafting a new blog post and want to add the Tooltip to hyperlink , simply shift to HTML mode and paste the following code.

<a href="LINK-URL">KEYWORD<span class="rbtooltip">Tooltip Text</span></a>

  • Replace LINK-URL with your preferred url
  • KEYWORD represent the anchor text of the link
  • Tooltip Text is the description text that with appear when you hover your mouse cursor on the hyperlink.
  • Done!

Hope you find this post useful? Feel free to share it using the share button. Any queries or suggestions is welcome.
Read more→

Disable CopyNShare - Copied Text Ending With #sthash

The most frequently asked question by our readers is that, they suspected someone (maybe an hacker) is tampering with their blog, because they notice that when they copied any line of text on their blog, it always come with - See more at: The post url #sthash, how can they fix that? This problem also occur on this blog too due to the ShareThis script that was used on this blog. This is not a problem friends, it just another intergration of new tracking feature introduce by Sharethis called CopyNShare.


CopyNShare can be use to track all sharing that occur on your blog when a user copies and paste any line of your blog which always come with a unique #sthashtag after the pasted text.
If you have been using ShareThis widget or our floating bar, then you may experience such bug. All what we need to do is to disable CopyNShare.

How to disable CopyNShare in Wordpress

  • Go to Plugins > ShareThis 
  • Uncheck Enable CopyNShare Beta


  •  Done!

How to disable CopyNShare in Blogger

  • Go to your blogger dashboard
  • Click on Template > Edit HTML > Proceed (Mark/Tick Expand Widget Template)
  • Use ctrl F to find the following line

<script type='text/javascript'>stLight.options({publisher: "xxx-xxxxxxx-xxxxxx-xxxxxxxx"});</script>

To find the above code easily, simply search for stLight.options and replace the script above with the following code.

<script type='text/javascript'>stLight.options({onhover:false , doNotHash: true, doNotCopy: true, hashAddressBar: false});</script>

  • Save your template and you are done!

Now you will be able to copy and line of text in your blog without any text ending it. If you have been experiencing any difficulty in using any of our script, we really apologies, everything should now be working fine now. Any queries or suggestions is welcome.
Read more→

Feedburner Showing False Email Subscribers - Back It Up

Feedburner is the most widely used email subscription service and due to this vastly usage, Feedburner have been facing some technical problems, which makes most blogger to start shifting to premium email service like Aweber and FeedBlitz.
Recently, Feedburner also encounter a problem concerning the FeedCount chicklet displaying zero subscribers for all subscribers instead of showing the correct number for both RSS Feed readers and email subscribers and this happens to be around 24 September 2012 or so. Now here comes another similar issue, most bloggers are complaining that their email subscribers list are totally wiped off while some are reduce to a very nastiest point.


What should i do?

There is nothing to worry about, such technical issues are obvious to large email service like Feedburner. This doesn't disturb your email subscribers from receiving your post update via their email account and don't worry about loosing your subscribers list even if you don't have any backup. It's just another bug, your subscribers list will be restored to the last piece as soon as the issue is resolved, though there is no update from Feedburner for now, but hopefully the problem should be resolved in 5days time.
Visitor's judge site reputations base on the social and email subscribers. So in other not to leave a negative impression on new visitor's, it is advisable that you remove the FeedCount chicklet from your blog until the bug is fixed, and for you to stay on the safe side, always backup all your things

How To Backup Your Email Subscriber Lists


The first step is to login into your Feedburner account and choose the blog in which you want to backup the subscriber list. Now from the navigation tab, click on Publize > Email Subscriptions > Subscription Management


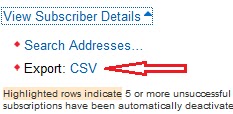
Now scroll down and click on View Subscriber Details and it will display two options, just click on the Export: CSV and you will be prompted to save a file which contains all your email subscribers. Choose where to save the file and you are done.


Have you been facing this same issue? Then feel relaxed, hopefully the problem will be fixed soon, and don't be scared of loosing your hard earned subscribers, it's just another bug, but make sure to backup your subscriber lists.
If you have a queries or suggestions, please don't hesitate to ask.
Read more→

Recent Posts

Let's Connect

Site Links

Copyright © 2014 RealcomBiz. All Rights Reserved.
Powered by Blogger